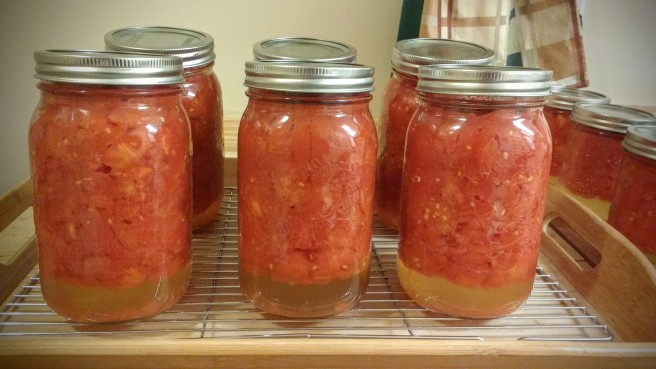
Today my grandma taught me how to can my own tomatoes! I only wish I knew sooner how easy it could be! It is something she has been doing for decades – starting back when she lived on the prairies with no running water or refrigeration and grew her own food! What a concept! My gardening skills have a long way to go before I’m growing enough to make it through the whole year. Thank you Grammy for passing on your recipes!!
Canning your own produce is an awesome idea for so many reasons. For starters, you get the tastiest in-season produce, and you get it in bulk for cheaper. In addition, you know exactly what you will be adding and that you won’t be sprinkling any chemical preservatives or unnecessary ingredients in there. Plus you’ll be using glass instead of BPA-lined tin cans. And finally you get to enjoy something you made all year long! Or enjoy giving it away as a great gift idea!
Here’s what you need:
- A friend or partner – “many hands make light work”
- 20 lbs of fresh, ripe tomatoes
- ~15 500mL or pint size mason jars
- salt & sugar
- canner (*Don’t have a canner? See tip below!)
- pot for boiling water
- large clean bowl for tomatoes
- a clean sink
Here’s what you do:
- Set everything up so it’s ready to go before you begin
- Wash the mason jars in warm soapy water and put all except the outer ring of the lids into the dishwasher on rinse cycle. Do this right before you begin because you want the jars nice and warm when you add the tomatoes.
- Blanch the tomatoes, about 7 at a time (place into pot of boiling water for about a minute and then remove and place into sink full of ice cold water)
- Peel the skin off the tomatoes and core.
- Dice into bowl, juice and all, removing any bad bits as you go. Every once in a while, run your fingers through them and squeeze – this helps bring more seeds up to the surface (you’ll see why later).
- Remove jars from dishwasher and place on old dish cloth or paper towel on the counter. Fill about 3/4 full using hands (don’t worry about adding all the juice yet)
- Pour the last bit of juice left in the bowl through a strainer and discard the leftover seeds in the strainer. Use the juice to top up the mason jars, leaving 1/2 inch of room at the top of the jar.
- Add 1/2 tsp salt and 1/2 tsp sugar to each jar. No need to mix.
- Dry the mouth of the jar with a paper towel.
- Place lids on and tighten all the way and then reverse as if you were going to open the jar, but just a smidgen. This will allow the jars to “breath” so they don’t explode.
- Put the jars into the canner and turn on the burner. Bring water to boil and then start the timer for 20 minutes.
- After timer goes off, turn off the burner and take lid off canner. Allow water to settle and then gently wipe the water off the top of the mason jars and carefully remove, placing on rack to cool. Leave the lids as they are, don’t tighten them.
- If you see clear liquid at the bottom of the jar and you hear the lid “pop” you know it has sealed properly.
- Once cooled, store in a dark place where the temperature doesn’t fluctuate.
*TIP: Don’t have a canner? If you want to try canning just a few things at a time, you can use a large pot, add water, and put the jars in on top of some extra mason jar lids so they don’t bump around and break in the pot. Or if you have a roaster with a tight lid that won’t let the steam out and some pieces of wood you could put on the bottom of it, you could place that over two of your burners and use as a canner that way. Or you could try the pickled beet recipe below which doesn’t require a canner at all!
If you want my grammy’s recipes for Canned Peaches, Pears, and Pickled Beets, continue reading below! Continue reading
